


Salesforce Superbadges are often described as advanced Trailhead credentials.
That description is technically correct, but it does not explain why so many capable learners struggle with them.
A Superbadge is not simply a longer Trailhead module. It is a practical assessment designed to test whether you can understand a business requirement, translate it into Salesforce configuration, identify dependencies, and deliver a working solution.
That is very different from following step-by-step instructions.
After more than 15 years of working with Salesforce, I have learned that most Superbadge failures are not caused by a lack of platform knowledge. They happen because learners approach the challenge without a clear method.
They begin configuring too early, overlook dependencies, misunderstand the business requirement, or treat every challenge-checker error as a technical failure.
The better approach is to solve a Superbadge the same way an experienced Salesforce professional would solve a real business problem.
This guide explains that approach.
What Makes Salesforce Superbadges Difficult?

Trailhead modules usually teach a concept and then guide you through the implementation.
Superbadges do the opposite.
They present a business scenario and expect you to decide:
- What needs to be configured
- Which Salesforce feature is appropriate
- In what order the solution should be built
- How the configuration should be tested
- Whether the final outcome meets the stated requirement
The instructions may tell you the expected result, but they may not tell you every click required to achieve it.
That is intentional.
A Superbadge is testing your ability to connect knowledge across multiple Salesforce areas.
For example, one requirement may involve:
- Custom objects and fields
- Record types
- Validation rules
- Flows
- Permission sets
- Reports
- Sharing settings
- User access
- Data quality
The challenge is not necessarily creating each component. The challenge is making all those components work together.
The Biggest Mistake: Starting Configuration Too Early
One of the most common mistakes is opening the Superbadge org and immediately beginning the first task.
This feels productive, but it often creates unnecessary rework.
Superbadge requirements are usually connected. A decision made in the first section may affect automation, security, reports, or testing in a later section.
Before touching the org, read the entire scenario.
Read it once to understand the business context.
Read it again to identify the technical requirements.
Then read it a third time to find dependencies, naming requirements, and testing conditions.
Experienced Salesforce professionals do not start building immediately after hearing the first sentence of a requirement. They first understand the complete problem.
Superbadges should be approached in the same way.
Step 1: Understand the Business Scenario
Every Superbadge begins with a business problem.
Do not treat that scenario as background text. It contains clues about the correct solution.
Identify the following:
Who are the users?
Determine which users, teams, profiles, roles, or departments are involved.
Ask:
- Who creates the records?
- Who updates them?
- Who approves them?
- Who should only view them?
- Who should not have access?
What outcome does the business need?
Focus on the result, not only the configuration.
For example, the business may need to:
- Prevent incomplete records
- Automate a manual process
- Restrict sensitive information
- Improve reporting accuracy
- Assign work to the correct team
- Notify users when conditions are met
What rules must be enforced?
Look for statements such as:
- Users must not be able to
- Only specific users should
- Automatically update
- Display an error when
- Require approval before
- Show records that meet
These phrases usually translate directly into configuration requirements.
What must be measured?
If the scenario mentions visibility, performance, trends, adoption, pipeline, service levels, or exceptions, reporting may be required.
Understanding the business intent helps you choose the correct Salesforce feature.
Step 2: Convert the Requirements into a Checklist
Never rely on memory while solving a Superbadge.
Create a checklist before beginning.
Break each requirement into smaller technical actions.
For example:
Data Model
- Create or verify objects
- Create fields
- Confirm field types
- Confirm API names
- Configure relationships
- Configure record types
- Update page layouts
Security
- Review organisation-wide defaults
- Create permission sets
- Configure field-level security
- Assign object permissions
- Confirm record access
- Test as the intended user
Automation
- Identify the correct automation tool
- Define the trigger
- Define entry conditions
- Create decision logic
- Configure updates or actions
- Test positive and negative scenarios
Data Quality
- Create validation rules
- Confirm error conditions
- Add appropriate error messages
- Test valid and invalid records
Reporting
- Create the required report type
- Add filters
- Add grouping
- Add summary calculations
- Save with the exact required name
- Save in the correct folder
This checklist becomes your implementation plan.
It also helps you identify where one requirement depends on another.
Step 3: Pay Close Attention to Exact Names
Many learners assume that if the configuration works, the challenge checker will pass.
That is not always true.
Superbadge challenge checkers may look for specific metadata and configuration details.
These can include:
- Object labels
- Field labels
- API names
- Flow names
- Validation rule names
- Permission set names
- Report names
- Dashboard names
- Folder names
- Record type names
- Picklist values
- Error messages
- Filter conditions
A technically correct solution may still fail if the expected component is named differently.
For every item you create, compare the name with the requirement.
Do not improvise unless the instructions allow it.
Also remember that labels and API names are not the same.
If you rename a label after creating a component, the API name may remain unchanged. Always verify both when the challenge depends on exact metadata.
Step 4: Build in the Correct Order
The order of implementation matters.
A reliable sequence is:
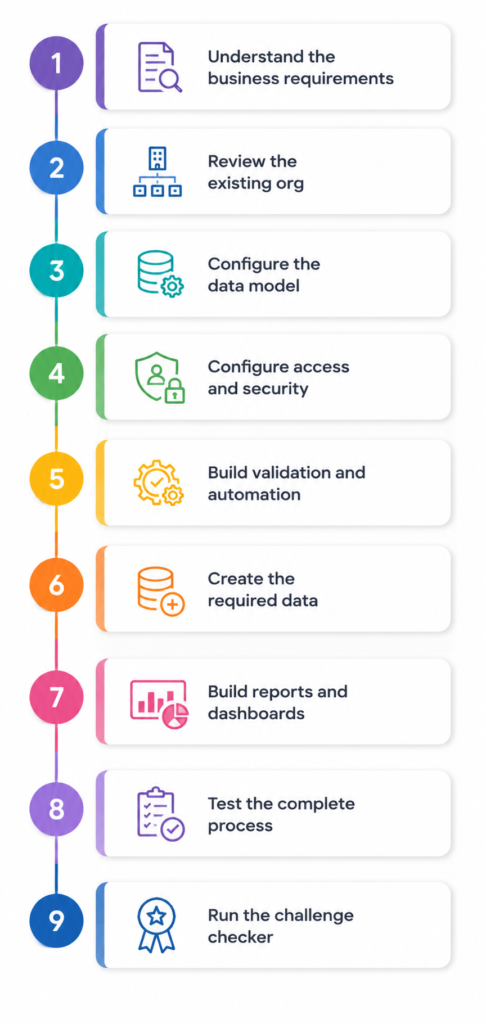

This order is not mandatory for every Superbadge, but it prevents many common problems.
For example:
- A flow may fail because a required field does not exist
- A report may show no results because test data is missing
- A user may not see a record because sharing has not been configured
- A validation rule may block data needed for testing
- Automation may behave differently because permissions are incomplete
Building in dependency order reduces confusion.
Step 5: Inspect the Existing Org Before Creating Anything
Superbadge orgs often contain existing configuration, records, users, or metadata.
Do not assume the org is empty.
Before creating a new component:
- Search for existing fields
- Review current flows
- Check validation rules
- Review permission sets
- Inspect record types
- Check existing reports and folders
- Review sample data
- Confirm active and inactive automation
Creating duplicate components can cause challenge failures or unexpected behaviour.
For example, a field with a similar label may already exist but use a different API name. A flow may already update the same record. A permission set may already contain some of the required access.
Take time to understand the current state of the org.
That is also how real Salesforce projects should begin.
Step 6: Choose the Correct Salesforce Tool
A Superbadge may describe an outcome without explicitly naming the feature you must use.
This is where platform understanding becomes important.
Use a validation rule when:
- A record should not be saved under certain conditions
- Required logic depends on multiple fields
- Users need an immediate error message
- Invalid data must be prevented
Use Flow when:
- Records must be created or updated automatically
- Logic requires decisions or multiple actions
- Notifications must be sent
- A guided user process is required
- Related records must be handled
Use a formula field when:
- A value should be calculated dynamically
- The result should not be manually edited
- The calculation should always reflect current data
Use a permission set when:
- Additional access is required for specific users
- You want to avoid changing the base profile
- Object, field, tab, or system permissions must be extended
Use sharing tools when:
- The user has object access but cannot see the correct records
- Record ownership or role hierarchy does not provide enough access
- Access must be extended based on criteria or groups
Use a report when:
- The business needs visibility into existing data
- Records must be filtered, grouped, or summarised
- A result needs to be displayed in a dashboard
Selecting the correct tool is part of the assessment.
Step 7: Test More Than the Happy Path
A configuration is not complete because it works once.
You need to test both expected and unexpected scenarios.
For every requirement, test at least:
Positive scenario
The configuration should run when all required conditions are met.
Negative scenario
The configuration should not run when the conditions are not met.
Boundary scenario
Test values at the edge of the rule.
For example:
- Exactly equal to the threshold
- One day before or after the expected date
- Blank versus populated
- Active versus inactive
- Owner versus non-owner
- Admin versus standard user
Permission scenario
Confirm what happens when the intended user performs the action.
A system administrator can bypass or access many things that a normal user cannot.
Testing only as an administrator is one of the most frequent causes of false confidence.
Step 8: Test as the Correct User
Salesforce behaviour depends heavily on user context.
A solution may work perfectly for a system administrator and fail completely for a standard user.
When possible, test using the relevant user.
Verify:
- Object permissions
- Field-level security
- Record access
- Record type access
- App visibility
- Tab visibility
- Flow permissions
- Apex access, when applicable
- Report folder access
- Dashboard folder access
Also check whether the user has access through a profile, permission set, permission set group, role hierarchy, sharing rule, or ownership.
The question is not only, “Does the solution work?”
The correct question is, “Does the solution work for the intended user under the expected access model?”
Step 9: Understand Challenge-Checker Errors
When a challenge fails, do not immediately delete and rebuild the configuration.
Read the error carefully.
The checker may be telling you:
- A component is missing
- The name is incorrect
- A filter condition is wrong
- A required field is not configured
- Access has not been assigned
- The automation is inactive
- The expected record does not exist
- A value is incorrect
- The wrong metadata type was used
Use the error message as a diagnostic clue.
Then follow this sequence:

Avoid changing multiple things at once.
When you change several components simultaneously, you may solve the issue without understanding the cause. That makes the next failure harder to diagnose.
Step 10: Be Careful with Flow
Flow-related Superbadges can be especially challenging because a flow may save successfully but still produce the wrong result.
When building a flow, verify:
Trigger
- Is it record-triggered, screen-based, scheduled, or autolaunched?
- Does it run when a record is created, updated, or both?
- Does it run before save or after save?
Entry conditions
- Are the conditions correct?
- Is the logic using AND or OR appropriately?
- Should the flow run every time or only when the record changes to meet the condition?
Decision logic
- Are all outcomes defined?
- Is the default outcome appropriate?
- Are blank values handled?
Record operations
- Are you updating the correct record?
- Are you using the correct related record?
- Could the flow create duplicate records?
- Could the flow repeatedly trigger itself?
Activation
A saved flow is not necessarily active.
Always confirm that the correct version is activated.
Testing
Use Flow Debug where appropriate, but also test by performing the real business action in the org.
A debug run may not fully reproduce user permissions or record-triggered behaviour.
Step 11: Be Precise with Validation Rules
Validation rules often fail because the logic is reversed.
Remember:
A validation rule displays an error when the formula evaluates to TRUE.
This means your formula must describe the invalid condition.
Before saving the rule, explain it in plain language.
For example:
“This error should appear when the opportunity is closed won and the contract date is blank.”
Then confirm that the formula evaluates to TRUE only in that situation.
Also verify:
- Blank-value handling
- Picklist functions
- Date logic
- Profile or permission exceptions
- Record type conditions
- Whether the rule should apply during data migration or automation
A strong error message should tell the user what needs to be corrected.
Avoid messages that only say “Invalid data.”
Step 12: Do Not Ignore Reports and Dashboards
Reports may appear easier than automation, but challenge checkers can be strict about report configuration.
Check:
- Report type
- Filters
- Filter logic
- Date range
- Grouping
- Columns
- Summary fields
- Row-level formulas
- Bucket fields
- Chart type
- Folder
- Report name
- Dashboard component
- Running user
A report may appear correct visually but still fail because the wrong report type or filter operator was used.
Also verify that the required records exist.
A correctly configured report with no matching data may make testing difficult.
Step 13: Keep Notes While You Work
Document your changes as you progress.
You do not need a formal design document, but maintain a simple working log.
Record:
- What you created
- The API name
- Why it was created
- What requirement it supports
- How it was tested
- Any assumptions made
- Any challenge-checker errors received
This is especially useful for longer Superbadges.
Without notes, learners often revisit the same configuration repeatedly or forget why a component was created.
A simple implementation log makes troubleshooting more systematic.
Step 14: Avoid Random Trial and Error
Repeatedly changing settings and clicking “Check Challenge” is not an effective method.
It may eventually produce a passing result, but it does not build expertise.
Before making a change, ask:
- What evidence suggests this is the problem?
- Which requirement does this configuration support?
- What result should change after this update?
- How can I test the change manually?
This discipline separates problem-solving from guessing.
Superbadges are designed to help you develop that discipline.
Step 15: Do Not Depend Entirely on Copied Solutions
Online walkthroughs can be useful when you are genuinely stuck, but copying every step removes much of the learning value.
There are also practical risks:
- The Superbadge may have changed
- Salesforce releases may have changed the interface
- The walkthrough may use an outdated feature
- The author may have made assumptions that do not apply to your org
- You may reproduce a configuration without understanding it
Use external guidance to understand a concept, not simply to duplicate clicks.
A better approach is:
- Attempt the requirement yourself
- Identify the exact point of confusion
- Review the relevant Salesforce documentation or Trailhead content
- Return to the requirement
- Build and test your own solution
The goal is not only to earn the badge.
The goal is to become capable of solving similar problems in a real Salesforce environment.
A Practical Superbadge Troubleshooting Framework
When a challenge fails, review the solution in five layers.

Most Superbadge problems can be located in one of these five layers.
A Recommended Workflow for Every Superbadge
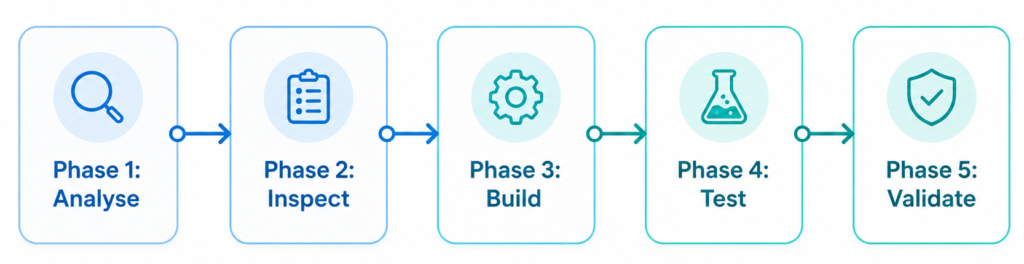
Here is a repeatable process you can use.
Phase 1: Analyse
- Read the complete scenario
- Identify users and business outcomes
- Highlight exact naming requirements
- Identify dependencies
- Create a checklist
Phase 2: Inspect
- Review existing metadata
- Review sample data
- Check active automation
- Check existing permissions
- Confirm the org is ready
Phase 3: Build
- Configure the data model
- Configure security
- Build validation
- Build automation
- Create reports and dashboards
Phase 4: Test
- Test as an administrator
- Test as the intended user
- Test positive scenarios
- Test negative scenarios
- Test access and visibility
- Confirm exact output
Phase 5: Validate
- Run the challenge checker
- Read the full error
- Isolate the likely cause
- Make one controlled change
- Retest manually
- Run the checker again
This process may feel slower at the beginning.
In practice, it saves time because it reduces rework and random troubleshooting.
Common Reasons a Superbadge Challenge Fails
Here are some of the most frequent causes:
- Incorrect API name
- Incorrect label
- Flow is not activated
- Wrong flow version is activated
- Entry conditions are incomplete
- Incorrect AND/OR logic
- Wrong report type
- Incorrect report filter
- Report saved in the wrong folder
- Permission set created but not assigned
- Field-level security not configured
- Record type not assigned
- Validation rule logic is reversed
- Required sample data is missing
- Test performed only as administrator
- Duplicate metadata was created
- Existing automation interferes with the solution
- A picklist value has incorrect spelling or capitalisation
- A date condition uses the wrong operator
- The wrong user owns the record
- A requirement was interpreted technically but not functionally
Review these areas before rebuilding your solution.
What Superbadges Actually Teach
Superbadges teach much more than Salesforce configuration.
They develop skills that are essential for Salesforce professionals:
Requirement analysis
Understanding what the business is asking for.
Solution design
Choosing the right Salesforce capability.
Dependency management
Building components in the correct order.
Security awareness
Ensuring the right users have the right access.
Testing discipline
Validating both successful and unsuccessful scenarios.
Troubleshooting
Finding the root cause instead of guessing.
Attention to detail
Following exact names, values, conditions, and outcomes.
These are the same skills required in real Salesforce implementations.
Final Advice for Salesforce Learners
Do not measure your Superbadge ability by how quickly you complete the challenge.
Measure it by how clearly you can explain your solution.
After completing a requirement, ask yourself:
- Why did I choose this feature?
- What alternative options did I consider?
- How does this configuration satisfy the business requirement?
- What happens if the data changes?
- What happens if a different user performs the action?
- How did I test the solution?
- What could fail in production?
If you can answer those questions, you are not simply completing a badge.
You are learning to think like a Salesforce consultant, administrator, developer, or architect.
The most effective way to solve Salesforce Superbadges is simple:

A Superbadge is not a test of how many Trailhead steps you remember.
It is a test of how you solve problems.
That is what makes it valuable.


Leave a Reply